Chemistry Demonstration

Overview

Total time: 50 minutes Disappearing Smoke: 20 minutes Bouncy Ball: 30 minutes
Suggested number of students: 30 students

Goals

  • Demonstrate difference between a physical and chemical reaction to students
  • Introduce students to chemical reactions and limiting reagents through visual chemical reactions

Materials Needed


Demonstration 1: Disappearing Smoke Items Amount
Giant Jar 1
Matches several
Incense (or something to make smoke) optional
Isopropyl Alcohol 2 capfuls
Safety Glasses and Gloves # of students
Demonstration 2: Bouncy Ball Items Amount
Borax 1 teaspoon
White Elmer's Glue clear school glue makes clear ball
Warm Water 6 teaspoons
Small plastic mixing cups 2
Spoon to stir 1
Measuring Spoons (or just plastic spoons) 1-2
Zip-lock bag 1
Cornstarch (optional) 1 tablespoon
Food Coloring (optional) drop

Introduction

There are some topics you may want to go over with students before this lesson.

  • Chemistry is a science of trial and observation: scientists mix things together in different amounts under different conditions, and see what happens. Then they try to explain what they see using what they know about matter -- including atoms, the smallest part of life.
  • Physical and chemical change is different Chemical change is moving around atoms. Physical change DOES NOT involve moving around individual atoms. This is comparable to making something with individual lego pieces. We can break lego pieces apart and put them back together differently. Atoms are essentially like this -- they can make and break connections at the smallest level Changes can be undone, like water. ice comparable to having large pieces made from legos and these large pieces being reshuffled around (individual legos are not moving around)
  • It may be tricky to differentiate between a chemical and a physical change Key question to ask is, "Can I change this back to what I had before without putting in too much energy, or without having to go through a lot of trouble?" ----> Physical changes don't form new products!

Lesson: Disappearing Smoke Demo

PLEASE USE GLOVES AND SAFETY GOGGLES WHEN DOING THIS DEMO!!

  • Preparation
  • 1) Prepare the jar of smoke before class.
  • 2) Start of class, demo with another mentor the burning smoke. Then discuss.
  • Procedure [source 1]
  • 1) Light the tip of incense and place in giant jar. Cover opening of the jar enough to let smoke fill up the jar. It will take from thirty seconds to a minute to completely fill up the jar.
  • 2) Once the jar is filled, pour some isopropyl alcohol into the jar and shake the jar to induce vaporization of the alcohol. This will allow the alcohol to vaporize. Allow the vapor to fill as much of the jar as possible.
  • 3) Light a match, and carefully drop into the jar, and watch as the smoke disappears.
  • Alternative Procedure without incense
  • 1) Pour isopropyl alcohol into jar, ~2 capfuls. Close lid of jar and shake for 2-3 minutes. Make sure to shake such that the alcohol vaporizes throughout the container.
  • 2) Once ready, unscrew the cap of the jar (or loosen the jar cover if there is no cap), light a match, and drop it into the jar. (This works best with two people, with one person working with the match, and the other opening the top of the jar once the match is lit, to prevent any of the vapor from escaping.) If this works successfully, you should be able to witness a "rising flame demo". If you don't get to see this, don't fret
  • because you can still continue on with the demo.
  • 3) If the match starts to smoke upon making contact with the alcohol at the bottom of the jar, make sure to quickly fasten the lid onto the jar, and let the smoke collect in the jar. It may take a few minutes for enough smoke to visibly fill up the jar. (If the first match didn't smoke enough, you can try shaking the jar again, and dropping in a second one. Jar should start filling up with smoke)
  • 4) Make sure you continue shaking even while the smoke is collecting, as this will allow the alcohol to vaporize (and remain vaporized) throughout the jar.
  • 5) Once enough smoke has collected in the jar, you do as you did before. Light a match and drop it in, and you should see the smoke disappear from the jar.

Lesson: Make a Bouncy Ball Demo

PLEASE USE GLOVES AND SAFETY GOGGLES WHEN DOING THIS DEMO!!

  • Outline
  • 1) Have materials laid out on tables already. We’ll need spoons, a container of glue, some borax in a bowl.
  • There will be seven bowls per two people: three for glue (to run three trials) and one for holding the borax solutions in each of the trials. Mentors are recommended to join a group and do the trials alongside the students; they could even run the trial with the cornstarch so students will be able to see what happens with the addition of cornstarch. Goal is to run two trials, a third if people finish and want to do a third try
  • Procedure [source 1 + feedback from trials]
  • 1) One cup will contain the borax mixture and the other a ball mixture
  • 2) Pour 2 tablespoons (or 6 walgreens plastic spoonfuls) of warm water and ½ teaspoon (or ½ walgreens plastic spoonfuls) borax powder into the cup for the borax solution. Stir the mixture to dissolve the borax.
  • 3) Pour 1 tablespoon (or 3 walgreens plastic spoonfuls) of glue into the cup for the ball mixture. You may add food coloring to give the bouncy ball color. Add ½ teaspoon (or ½ walgreens plastic spoonfuls) of the borax solution you just made. Do not stir. Allow the ingredients to interact on their own for 20-30 seconds and then stir them together to fully mix. Once the mixture becomes impossible to stir, take it out of the cup and start molding the ball with your hands.
  • 4) The ball will start out sticky and messy, but will solidify as you knead it.
  • 4.5) If it's still sticky, add just a little bit more borax solution to the surface, and continue molding it. Repeat this step as many times as necessary, but be careful, as adding too much borax will be detrimental to the project.
  • 5) Once the ball is less sticky, it is ready to be bounced!
  • 6) You can store the ball in the ziplock baggie for later use.
  • Alternate Procedure (working in pairs) [source 2]
  • Proportions for this mixture:
  • 1) 12 walgreen spoonfuls of warm water
  • 2) 6 spoonfuls of glue
  • 3) 1 spoonful of borax
  • When you add the borax solution to the glue, you will have to add 1 walgreens spoonful of the solution
  • Try making another bouncy ball, but this time include cornstarch (1 tablespoon or 3 walgreens spoonful is the recommended amount). Or, you can try it again but with different proportions of the ingredients. What happens?

Suggestions:

As students are working, try to As students are working, try to explain what is happening in the reaction. Group leader will go over this information when group recollects.

"Glue is a polymer called polyvinyl acetate. Polymers are long chain-like molecules made up of repeating units. The original glue chains were sticky and runny. Adding the borax, a crosslinker, tied some of the polymer chains together, restricting their flow and creating the putty like material students worked with. The crosslinking of the polymer is an example of a chemical change. The polymer chains are bonded together changing the properties of the polymer to make it more viscous (flows more slowly) and more bouncy." [source 3]


Post Lesson Discussions

Disappearing Smoke Discussion:

This was an example of a chemical change because of the combustion. This is also an example of a physical change because of the isopropyl alcohol. The alcohol had to vaporize (the way water vapor forms when water boils--kind of like the steam) and we helped speed up this process by shaking the jar.

What characteristics of a chemical reaction did it have?

Concept check question: So to review, what type of reactions did this demo exhibit? Are there any questions?

Bouncy Ball Discussion:

1. Was this a chemical reaction or a physical reaction?
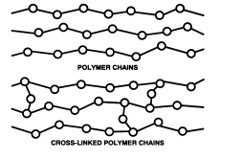
Chemical reaction because of polymer cross linking. Molecules don't normally come together, but because of borax they cross link together.

2. Give an example of each of a chemical reaction and of a physical reaction in everyday life. Explain why they are an example of that type of reaction.

C) Pepsi Mentos (physical reaction) - will have to be done outdoors (10 minutes) Materials:

a) Liter bottle of Diet Coke b) Mentos

1) Place Diet Coke in an open area

2) Drop mentos into Diet Pepsi, and watch it fountain out

Run demo about 5 times:

Do it once with 2-3 mentos. Discuss. Type of reaction? Physical. Why? Was anything produced? Was anything consumed? Nucleation site. Kind of like pushing the first domino in a stack of dominoes. Without that first one none of them will fall.

Do three more times. Let students pick a number and predict what will happen. Demo.

Fifth bottle, predict what will happen, then drop mentos in bottle and close cap.


Resources

Disappearing Smoke